I didn't do an update last week and I don't really have much of one for this week. I went through this terrible peeling phase and I am so thankful that seems to have ended. I still peel a little, but it is more of a dandruff than a sunburn peel.
The one issue is that I am SO ITCHY. I seriously look like I must have lice or something because I always catch myself absentmindedly scratching my head. And scratching your head in a wig is like trying to do it through a hat- not very satisfying. Especially through the scalp area of the wig, which is like a solid piece of material that makes it look like a natural scalp showing in my part. Sometimes when no one is looking I just reach up under the wig and scratch.
Its not torturous itching, just always there.
I've noticed some traffic coming into the site by people researching Anthralin. If you are here because you have Psoriasis (what Anthralin is designed for) then I can't really help you. But if you are here because of Alopecia, then hi! I will give a quick recap on my treatment so far:
I just finished week 6, so I am still early in my treatment (can take 3 months to see results) and I am not seeing any changes yet! I found that after a week or two you will start peeling like crazy and see a lot of discolouration on your scalp. However, once this phase ends, your skin will be just pinkish and it will start itching a lot. That is my experience, anyway!
As for application, here is what I do:
- Use a glove to rub cream thinly all over scalp
- Set timer for appropriate time (I am currently on 20 minute treatment and next week I move to 25)
- When timer goes off, put on gloves and use paper towel to wipe excess off
- Wash scalp with Head and Shoulders
It is very messy and stains everything so make sure you use a junky towel to dry your head and use an old pillow case at night. Also, be careful with clothing during and right after treatment. I find it stains the most when it is fresh on your head.
Now, to mourn the unintended victims of Anthralin in my condo
- My hand towels
- My shower curtain liner
- My entire shower/tub (ok, I just need to clean it more, it does come off these. Except grout.)
- My housecoat
- My grey pillow case
- My white towel, which somehow got a finger print on it
- My duvet cover, which also got a finger print on it!!
- There is also a finger print on the back of the bathroom door. I haven't tried to remove it yet so it is not a confirmed victim haha
On the other hand- I get to buy new stuff! woohoo! :P I'm a glass half-full kinda gal
Update: I wrote this post on a Monday. By the time I posted it on Saturday the itching had decreased considerably. Also, my friend Jeni thinks my head is definitely fuzzier. I disagree. Too bad it is hard to photographic white fuzz

Saturday, August 18, 2012


Friday, August 17, 2012
My Tips: Travelling on Public Transit
Ok, today's tips are for people just moving to the city, or perhaps visiting from out of town. Or even just people who have lived here all their lives but are ignorant of social norms. Oops...got a bit snarky there ;)
As I may have mentioned before, I do not own a car. I estimate this saves me $500 a month in insurance, gas and parking, so I am quite happy with my decision to use public transit. However once and awhile I am grumpy, and people on the TTC drive me nuts. So I am compiling the "Rules" that my friends and I agree on when it comes to using public transit
1. Don't be pushy and start running because the subway train is there. They come every 3 minutes. This is not an emergency
2. Stand off to the side and let people OFF the subway before you enter
3. Do not block the doors if you are on the subway and people want off. Simply step off and stand to the side and re-enter when the coast is clear
4. Try not to bring a large stroller on the TTC during rush hour. I totally understand the need, but it is just impossible and even you will get stressed out trying to get on the subway (FYI- bikes are banned during rush hour on the TTC. I think non-working pets too)
5. Take off your bulky backpack if it is crowded. It takes up a lot of room and hits short people in the face
6. Cover your mouth when you cough or sneeze. That's just gross
7. No clipping your nails!!
8. I am fine with people eating on the TTC, but try not to eat stinky foods. Or foods that smell delicious and make me drool
9. Use your indoor voice
10. Leave room for others to sit. We are all tired at the end of the day! So try not to take up two seats with your bag, or with the way you are sitting. Also, try not to sit on the aisle seat when the window seat is free- I just find that annoying
11. Escalators- this one is key- have rules! You stand on the right and let people walk on the left. This is a rule for EVERYWHERE but few people know it. It makes the flow so much nicer
12. If taking the streetcar, please look for cars when you exit, I don't want you to die
13. How did I miss this one earlier- get up for people who need a seat more than you! This could be the elderly, the blind, the infirm, a pregnant woman, or even someone with small children
14. Take your garbage with you.
15. Move as far back as you can on the bus or streetcar when it is busy. Heck, even on the subway you should move away from the doors. I've been on ridiculously cramped subways with giant luggage and I have always managed to get off at my stop
We are all in this commuting thing together, so let's all be polite!! :)
As I may have mentioned before, I do not own a car. I estimate this saves me $500 a month in insurance, gas and parking, so I am quite happy with my decision to use public transit. However once and awhile I am grumpy, and people on the TTC drive me nuts. So I am compiling the "Rules" that my friends and I agree on when it comes to using public transit
1. Don't be pushy and start running because the subway train is there. They come every 3 minutes. This is not an emergency
2. Stand off to the side and let people OFF the subway before you enter
3. Do not block the doors if you are on the subway and people want off. Simply step off and stand to the side and re-enter when the coast is clear
4. Try not to bring a large stroller on the TTC during rush hour. I totally understand the need, but it is just impossible and even you will get stressed out trying to get on the subway (FYI- bikes are banned during rush hour on the TTC. I think non-working pets too)
5. Take off your bulky backpack if it is crowded. It takes up a lot of room and hits short people in the face
6. Cover your mouth when you cough or sneeze. That's just gross
7. No clipping your nails!!
8. I am fine with people eating on the TTC, but try not to eat stinky foods. Or foods that smell delicious and make me drool
9. Use your indoor voice
10. Leave room for others to sit. We are all tired at the end of the day! So try not to take up two seats with your bag, or with the way you are sitting. Also, try not to sit on the aisle seat when the window seat is free- I just find that annoying
11. Escalators- this one is key- have rules! You stand on the right and let people walk on the left. This is a rule for EVERYWHERE but few people know it. It makes the flow so much nicer
12. If taking the streetcar, please look for cars when you exit, I don't want you to die
13. How did I miss this one earlier- get up for people who need a seat more than you! This could be the elderly, the blind, the infirm, a pregnant woman, or even someone with small children
14. Take your garbage with you.
15. Move as far back as you can on the bus or streetcar when it is busy. Heck, even on the subway you should move away from the doors. I've been on ridiculously cramped subways with giant luggage and I have always managed to get off at my stop
We are all in this commuting thing together, so let's all be polite!! :)
Thursday, August 16, 2012
I Had a Rackcident {How to Remove a Glued on Towel Rack}
Now that I am fairly confident in my bathroom re-do, it was time to start the demo!!!! hahaha, ok, not a real demo. But I was ready to tackle this "situation".

When I first moved in, my dad and I added the shelving so that I could store towels in the bathroom and have a space for hand towels. But now that I need two towels to shower (due to my Anthralin Treatment- see tab for Alopecia at the top) I was getting sick of the "towel wall". I think what I will eventually do is install a single hand towel hanger by the sink and have a single bath towel hung from the shelf.
What this means is that I no longer need the hideous builder basic plastic towel bar! In the meantime (since I still need placed to hang towels and I haven't made up my mind on anything) I picked up this $12.99 back of the door hanger thing.

Then I got down and dirty! Now my towel rack consisted of two brackets that were glued and caulked to the wall. The first thing to do it score along the caulking to break the seal:

Then use a metal putty knife in the corners and tap it in with a hammer. Try to angle it as best as possible away from the wall to avoid damage. Do a bit on each corner and you will feel it start to lift (your bar will fall out. haha). Then slide your knife in the side and carefully pry it off the wall.


Ta-da!
Next step is to fix your drywall. Luckily I had very little damage so I just cut away any excess pieces and caulk and applied my putty. If you have heavier damage, you can consider replacing the drywall or using a patch kit.


Now, last time I "puttied" I did a horrible job and it shows through the paint. So this time I took my time and did three thin layers (allowing the putty to dry from pink to white each time) and sanded in between each layer. Once I was happy, I could paint!!


Oh ya baby! This is a proud moment for me because I usually screw things things up and I have to call my dad crying to come fix it. hahaha
FYI- the previous homeowner picked this colour and left the can behind for me. It is Ralph Lauren Interior Satin in "Impressionist". I can't find it on their website, so maybe it was discontinued? But I shall give away the secret (shh):
It is a beautiful turquoise colour. Yes, there is a chance I will repaint to really make my bathroom feel new...but I love this colour and I want to share it!
The final product: Much less towel-ly
In other bathroom updates, I got a new toilet brush holder. The stainless steel Lillholmen brush/holder is way sexier than actually seeing the brush (gross). I also updated my magazine holder from a cardboard magazine file (always fell over) to the Pluggis holder from Ikea. I do have plans for the other pieces of this set. I considered mounting it, but I am not sure if it would look weird mounted in a bathroom? It would have to go where the towel rack was.

By the way, please don't tell me I am the only person who likes to keep magazines in the bathroom? haha. Usually I keep them behind the shower curtain (there is a liner on the inside of the shower so they don't get wet) because that seems more sanitary.
So there you go! Total update cost (things I didn't already own):
Door hanger thing: $13
New metal putty knife: $7
Toilet brush holder: $15
Magazine holder: $10
So $45 and a little sweat and I am well on my way to a sexy new bathroom!!

When I first moved in, my dad and I added the shelving so that I could store towels in the bathroom and have a space for hand towels. But now that I need two towels to shower (due to my Anthralin Treatment- see tab for Alopecia at the top) I was getting sick of the "towel wall". I think what I will eventually do is install a single hand towel hanger by the sink and have a single bath towel hung from the shelf.
What this means is that I no longer need the hideous builder basic plastic towel bar! In the meantime (since I still need placed to hang towels and I haven't made up my mind on anything) I picked up this $12.99 back of the door hanger thing.

Then I got down and dirty! Now my towel rack consisted of two brackets that were glued and caulked to the wall. The first thing to do it score along the caulking to break the seal:

Then use a metal putty knife in the corners and tap it in with a hammer. Try to angle it as best as possible away from the wall to avoid damage. Do a bit on each corner and you will feel it start to lift (your bar will fall out. haha). Then slide your knife in the side and carefully pry it off the wall.


Ta-da!
 |
| The one on the right looks happy |


Now, last time I "puttied" I did a horrible job and it shows through the paint. So this time I took my time and did three thin layers (allowing the putty to dry from pink to white each time) and sanded in between each layer. Once I was happy, I could paint!!


Oh ya baby! This is a proud moment for me because I usually screw things things up and I have to call my dad crying to come fix it. hahaha
FYI- the previous homeowner picked this colour and left the can behind for me. It is Ralph Lauren Interior Satin in "Impressionist". I can't find it on their website, so maybe it was discontinued? But I shall give away the secret (shh):
 |
| Ralph Lauren Impressionist Paint Colorant Code |
The final product: Much less towel-ly
 |
| Note to self- fold towels nicely before taking shots |

By the way, please don't tell me I am the only person who likes to keep magazines in the bathroom? haha. Usually I keep them behind the shower curtain (there is a liner on the inside of the shower so they don't get wet) because that seems more sanitary.
So there you go! Total update cost (things I didn't already own):
Door hanger thing: $13
New metal putty knife: $7
Toilet brush holder: $15
Magazine holder: $10
So $45 and a little sweat and I am well on my way to a sexy new bathroom!!
Wednesday, August 15, 2012
Bathroom Reno Plans
Omg...so here goes. Now that I am putting it on the internet, I am going to have to follow through!! Yes, I want to redo my bathroom. Not a total gut job, because I don't want to sink a lot of money into it as this condo is not intended to be my forever home (however, I have been here almost 3 years so maybe it is time to give up that fantasy haha).
Basically I want to take the "builder basic" out of my bathroom. here is what we are starting with:
Here is what I don't like about my bathroom:
My Vanity
I have never been fond of this vanity. The light wood with the detail does not fit the style of the condo (the doors and kitchen cabinets are flat and modern). The countertop it just boring cheap countertop and honestly, it wasn't a great install.

See? That isn't even a straight cut and the edges are all worn now. The only issue is that my sink area is in an alcove in the wall- and it is unfortunately 33.5" inches across, which is NOT a standard vanity size. Could be a challenge
My Floors
I don't like the floors in here. They are off-white, which is odd because the shower tiles are beige and the kitchen tiles are white. So why off-white? I do not like. Also, the grout is dark, which looks dirty all the time.
I think just changing up these two things will really help transform the space. I am currently also considering redoing the shower tile and putting up a glass shower door. As I have said, I don't want to spend a lot of money.
One of the first things I think I am going to tackle is the vanity. I really prefer a dark wood one. I want to see if I can restain the vanity, and then all I would need is to get a custom cut counter and an undermount sink (sexy!) and a tap. No idea what that would cost so clearly I have some homework to do.
If I can't work with my existing vanity, I will buy a new one. Here is my question for that- would it look weird if it doesn't go wall to wall in the alcove? I worry I will constantly drop things down the side. haha.
Anyway, I can't decide on the floor until the vanity is done because if I buy a new one with legs (my current one just has a kickboard) then the tile will need to extend under the vanity.
I can't make decisions so this is just going to be interesting!!
Now, back to my vanity. I am pretty sure it is veneer. Can I lightly sand and restain veneer?


Finally, to finish, here are some inspiration photos!
Trends are clearly:
- white and grey
- dark vanity
- grey countertop
- prettiness!!
Basically I want to take the "builder basic" out of my bathroom. here is what we are starting with:
 |
| Layout |
 |
| Shower Tile |
 |
| Crowded Towel Storage |
 |
| Outdated and crowded sink |
My Vanity
I have never been fond of this vanity. The light wood with the detail does not fit the style of the condo (the doors and kitchen cabinets are flat and modern). The countertop it just boring cheap countertop and honestly, it wasn't a great install.

See? That isn't even a straight cut and the edges are all worn now. The only issue is that my sink area is in an alcove in the wall- and it is unfortunately 33.5" inches across, which is NOT a standard vanity size. Could be a challenge
My Floors
I don't like the floors in here. They are off-white, which is odd because the shower tiles are beige and the kitchen tiles are white. So why off-white? I do not like. Also, the grout is dark, which looks dirty all the time.
 |
| And there is a chip in one! |
I think just changing up these two things will really help transform the space. I am currently also considering redoing the shower tile and putting up a glass shower door. As I have said, I don't want to spend a lot of money.
One of the first things I think I am going to tackle is the vanity. I really prefer a dark wood one. I want to see if I can restain the vanity, and then all I would need is to get a custom cut counter and an undermount sink (sexy!) and a tap. No idea what that would cost so clearly I have some homework to do.
If I can't work with my existing vanity, I will buy a new one. Here is my question for that- would it look weird if it doesn't go wall to wall in the alcove? I worry I will constantly drop things down the side. haha.
Anyway, I can't decide on the floor until the vanity is done because if I buy a new one with legs (my current one just has a kickboard) then the tile will need to extend under the vanity.
I can't make decisions so this is just going to be interesting!!
Now, back to my vanity. I am pretty sure it is veneer. Can I lightly sand and restain veneer?


Finally, to finish, here are some inspiration photos!
 |
| Source |
 |
| Source |
 |
| Source |
 |
| Source |
 |
| Source |
- white and grey
- dark vanity
- grey countertop
- prettiness!!
Tuesday, August 14, 2012
I got a Liebster Award!!
The fun part about blogging is getting to know random people from all over the world. I am slowing but surely making some friends who will totally let me crash on their couch when I travel around the world (haha). Actually, just last week I met The Bloggess at her book signing!! Her book is hilarious and it was really exciting to meet some as quirky as me! Ok, that is a lie- she is way cooler and quirkier than me. But she follows me on Twitter, so I must have something fun to offer!

In other news, the wonderful Nessa over at Isle Style Living nominated me for the Liebster Award! It is my first award for my blog...my parents are gonna be so proud.

Basically, Nessa nominated 5 people and gave us all 11 questions to answer. Then I am supposed to nominate other blogs with under 200 followers and ask my own questions.
I don't follow a lot of small blogs, so I am going to nominate the following:
Helen at Seaside Interiors
Linda at My Crafty Home Life
Nette at This Dusty House
Mrs. GI at The Great Indoors
Lisa at Upset Apple Cart
I am actually kind of shocked to realize these blogs have under 200 readers because they are awesomesauce and I always visit them for inspiration!
If you've been nominated you can do your own post, or just reply in the comments because I would love to hear your answers! Heck, even if you don't have a blog you can respond!
Here are my questions for you:
1. Why do you blog?
2. What is your ideal first date?
3. What is your favourite childhood memory?
4. If you could go anywhere in the world, where would you go?
5. What was the last thing you bought for the home?
6. If you could be more knowledgeable in one subject, what would it be?
7. What would you say is your biggest weakness?
8. What is your favourite food and when did you last eat it?
9. What is your leave favourite household chore
10. Do you have any fears?
11. How much wood would a woodchuck chuck if a woodchuck could chuck wood?
And now, I will answer the questions that Nessa came up with for me!

In other news, the wonderful Nessa over at Isle Style Living nominated me for the Liebster Award! It is my first award for my blog...my parents are gonna be so proud.
Liebster : a
German word that means sweetest, kindest, nicest, dearest, beloved,
lovely, kind, pleasant, valued, cute, endearing and welcome.
Basically, Nessa nominated 5 people and gave us all 11 questions to answer. Then I am supposed to nominate other blogs with under 200 followers and ask my own questions.
I don't follow a lot of small blogs, so I am going to nominate the following:
Helen at Seaside Interiors
Linda at My Crafty Home Life
Nette at This Dusty House
Mrs. GI at The Great Indoors
Lisa at Upset Apple Cart
I am actually kind of shocked to realize these blogs have under 200 readers because they are awesomesauce and I always visit them for inspiration!
If you've been nominated you can do your own post, or just reply in the comments because I would love to hear your answers! Heck, even if you don't have a blog you can respond!
Here are my questions for you:
1. Why do you blog?
2. What is your ideal first date?
3. What is your favourite childhood memory?
4. If you could go anywhere in the world, where would you go?
5. What was the last thing you bought for the home?
6. If you could be more knowledgeable in one subject, what would it be?
7. What would you say is your biggest weakness?
8. What is your favourite food and when did you last eat it?
9. What is your leave favourite household chore
10. Do you have any fears?
11. How much wood would a woodchuck chuck if a woodchuck could chuck wood?
And now, I will answer the questions that Nessa came up with for me!
1. Who is your hero and why?
I don't know if I have a true hero. I more try to focus on people who I find to be successful in a certain area (family, work, charity, etc) and I try to emulate them. I found this quote on Pinterest and it said "Live in such a way that if someone spoke badly of you- no one would believe it". So I try to do that and I admire people that I think have accomplished this! Oh, and my parents. They are my heroes too. Mostly cause they managed to raise me into somewhat of a normal person:)
2. If you could have any super power what would it be?
I would love to be invisible. I would TOTALLY spy on people. But not people who know me, cause what they say behind my back could be traumatizing. Still working on #1^
3. If you could erase something from your past without it changing who you are today, would you do it?
If I can be totally selfish here and not warn people about disasters or save people from death and disease, I would go back to University and be more outgoing. I was very shy and I stayed in my dorm a lot and I didn't meet people. In fact, I only made a few good friends in my last year (besides the awesome girls I lived with 2nd-4th year and who I was able to woo by being with every day). I really regret missing out on that time in my life.
4. Would you be able to live "off the grid" (no modern technology) for a week? A year?
A week, yes. A year? I don't know. I could easily go camping for a week with no cell phones or other electronics. And I have travelled for weeks at a time with no internet or phone! Heck, I even cancelled my cable last year (for a whole year!) just for kicks.
5. What's the craziest trend you've ever tried?
When I was in the 3rd grade my friends and I tried to make this new hairstyle where half your hair is up and the other down. Or something like that. We totally thought we were trendsetters and we could make this catch on. Sadly, it did not. haha
Monday, August 13, 2012
Raskog Love!
So, if you read my blog regularly (and you should, because it makes me happy to see followers and comments and all that jazz) then you would know that I had my heart set on the Raskog Kitchen Cart from Ikea! In my last post on it, I talked about all the options you could use it for:
Kitchen: Small rolling pantry, or a beverage cart
Dining room: Beverage cart, wine stand, replacement for a sideboard, if you have no space
Living room: small bookshelf, kids toy/book storage
Bedroom: Bedside table for those prone to knocking things over
Bathroom: Storage for toilet paper, toiletries, hair straighteners/driers
Patio/Garden: garden tool storage, plant stand, small garden stand for a balcony (for herbs or something)
Well I am excited to announce that the Raskog Kitchen Cart finally made it into my condo this weekend!! I have been checking the stock at both Ikeas in Toronto for weeks and finally Ikea Etobicoke said that they would have 11 in stock on Saturday! I have seen this cart popping up all over the place on blogs and pins etc, so I was worried it would disappear before I could grab one! I had plans Saturday, but they got bumped to Sunday, so I trekked out to Ikea and I went right to the self serve area and popped one in my cart!
I actually brought my old lady grocery cart to the store with me- key because this box was kinda large and heavy.

Once I got home, I put it together! It wasn't overly hard, but the screws are tiny and they stripped SO easily. Plus working with metal is hard if it is not lined up quite perfectly. The nice part is that the middle shelf is adjustable! I didn't know that, but it came in super handy for the use I made of my cart!
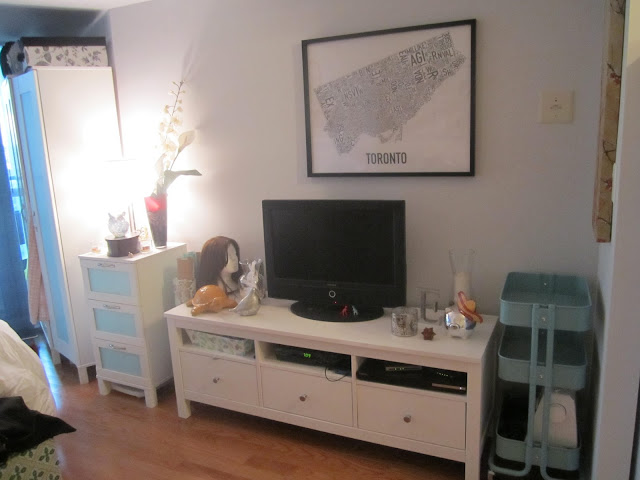
I decided to use cart to hold my sewing stuff! The sewing machine is heavy, so lifting it into the front hall closet wasn't desirable. Before I could stock it up, I had to find a good spot for it. My original thought was in a space beside my TV stand, but I didn't like how it was the same shape and size as my dresser.


I then moved the TV stand over and tried the other side, but then I felt like my couch/TV space got wonky and the TV stand was intruding on bedroom territory.
The next spot was in a sizable gap between the table and the couch. However, I would have to move the chair that tucks in there to access the cart.

Finally, I moved my couch over a bit and I put it on the other side! I liked it! It will be nice to have a side table and by shifting my TV stand over to the kitchen a bit more (and moving the wrapping paper), I was table to realign everything. But now my Toronto poster is off. Ah well, a project for another day.

But because this is a design blog, I decided to style it up by stealing things from around the condo!


Lamps are hard to photograph! The white tins on top hold all my sewing stuff (pins, measuring tape, scissors in large one and threads in the small). The second shelf has my DVDs and Blurays, which I keep in a CD sleeve case to save space (I have a LOT of movies. 90% of which may or may not have been stolen from my dad. shhh). The bottom just has my sewing machine!
All and all, I love this cart. It is solid, the middle shelf adjusts, and the colour is a really nice turquoise. In some photos it looked darkish, but it is quite bright and cheerful! My Ikea didn't have one on display so I was taking a risk buying it sight unseen.
Kitchen: Small rolling pantry, or a beverage cart
Dining room: Beverage cart, wine stand, replacement for a sideboard, if you have no space
Living room: small bookshelf, kids toy/book storage
Bedroom: Bedside table for those prone to knocking things over
Bathroom: Storage for toilet paper, toiletries, hair straighteners/driers
Patio/Garden: garden tool storage, plant stand, small garden stand for a balcony (for herbs or something)
Well I am excited to announce that the Raskog Kitchen Cart finally made it into my condo this weekend!! I have been checking the stock at both Ikeas in Toronto for weeks and finally Ikea Etobicoke said that they would have 11 in stock on Saturday! I have seen this cart popping up all over the place on blogs and pins etc, so I was worried it would disappear before I could grab one! I had plans Saturday, but they got bumped to Sunday, so I trekked out to Ikea and I went right to the self serve area and popped one in my cart!
I actually brought my old lady grocery cart to the store with me- key because this box was kinda large and heavy.

Once I got home, I put it together! It wasn't overly hard, but the screws are tiny and they stripped SO easily. Plus working with metal is hard if it is not lined up quite perfectly. The nice part is that the middle shelf is adjustable! I didn't know that, but it came in super handy for the use I made of my cart!
I decided to use cart to hold my sewing stuff! The sewing machine is heavy, so lifting it into the front hall closet wasn't desirable. Before I could stock it up, I had to find a good spot for it. My original thought was in a space beside my TV stand, but I didn't like how it was the same shape and size as my dresser.


I then moved the TV stand over and tried the other side, but then I felt like my couch/TV space got wonky and the TV stand was intruding on bedroom territory.

The next spot was in a sizable gap between the table and the couch. However, I would have to move the chair that tucks in there to access the cart.

Finally, I moved my couch over a bit and I put it on the other side! I liked it! It will be nice to have a side table and by shifting my TV stand over to the kitchen a bit more (and moving the wrapping paper), I was table to realign everything. But now my Toronto poster is off. Ah well, a project for another day.

But because this is a design blog, I decided to style it up by stealing things from around the condo!


 |
| Sorry- this is really blurry!! |
All and all, I love this cart. It is solid, the middle shelf adjusts, and the colour is a really nice turquoise. In some photos it looked darkish, but it is quite bright and cheerful! My Ikea didn't have one on display so I was taking a risk buying it sight unseen.
Subscribe to:
Posts (Atom)